
THE 7 LIGHT PARTS: | |
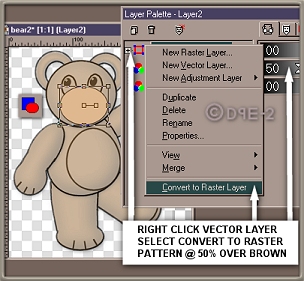 |
-PRESET SHAPES/ELIPSE- The inside Ear, Snout, Belly, Pad, Digit, Foot & Eyeball are made with this vector tool. Its used filled with the tan color on all, except the eyeball, set it for white. With the brown layer (merged bear) as the bottom layer & the Pattern over it at 50% opacity, choose this tool, click on the 1st shape, arrange the nodes to fit the pattern for that shape. In Layers palette, right click this vector layer, choose convert to raster, re-name this layer for the part. Repeat this step for other six. |
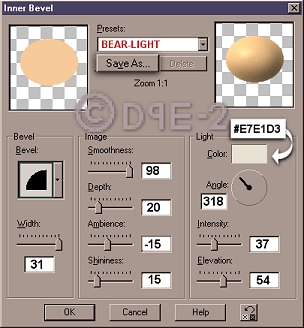 |
MAKING the PARTS 3-D Use same steps w/ these, as the brown, but use settings shown. For the digit, depth: 50, width: 1, after bevel duplicate this layer twice. Duplicate the ear once.-INNER BEVEL- -DROP SHADOW- (Not illustrated - only 3 parts) SNOUT: V: 1/H: 2/Op: 100/Bl: 12/black EYEBALL: V: -1/H: -1/Op: 100/Bl: 12/black Duplicate the eyeball layer, Image/Mirror, re-position this layer via the pattern. FOOT: V: -1/H: -1/Op: 80/Bl: 14/black re-position the foot at the very end of the brown leg. |
|
THE 5 DETAILS: | |
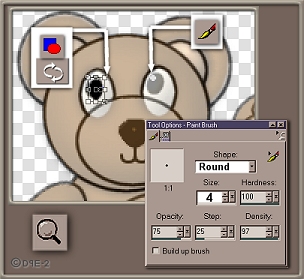 |
THE EYES Set the color to black. Position the mouse over the left eye on the pattern, the elipse will have to turn slightly, convert to raster layer, re-name it eye.-PRESET SHAPES/ELIPSE- work in Zoom -PAINT BRUSH- Set color to white & brush to size #4 /round, using the right eye on the pattern, as reference, place a dot in the eye, either right on the eye layer or make new layer. Duplicate, but don't mirror, place over the right eye on the pattern.
|
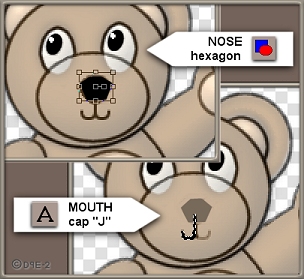 |
THE MOUTH Color black. New raster layer, named mouth. Click mouth area on pattern. Select type face: SWISS 721 SWA in 20pt, type in Cap "J", set text on this layer. Position on left side pattern, Duplicate, Image/mirror, position the down-stroke of the "J" to one thickness, Merge/Visible.-TEXT TOOL- work in Zoom -DROP SHADOW- V: 1/H: type in 0/Op: 100/Bl: 4/ Color: move your mouse over to the image and the pointer will turn into the dropper, pick a lighter color from the snout, but not the highlight, hit OK in both boxes.
|
 |
THE NOSE Color set to black. Position over nose on pattern, move nodes til you get something like the pattern, convert to raster layer, re-name nose.-PRESET SHAPES/HEXAGON- work in Zoom -EFFECTS/BLUR-
blur one time. 3-D EFFECTS: -INNER BEVEL- Use settings shown -DROP SHADOW- Vertical: 3/ Horizontal: 4/ Opacity: 50%/ Blur: 5/ Color: black. |
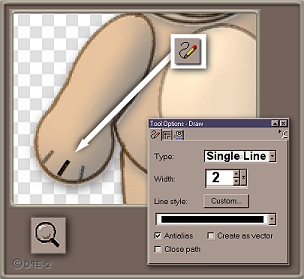 |
THE HAND & FOOT Use the settings shown for this tool. Set the Color to solid color: #53391D. Make a new raster layer, name it hand. Working over the Pattern, draw three lines at the hand position. Repeat the same proceedures to make the foot, name it foot 2.-THE DRAW TOOL- Work in Zoom. -DROP SHADOW-
These settings for both layers: Vertical: 1/ Horizontal: 2/ Opacity: 100%/ Blur: 8/ Color: #DCB792. |
|
THE END | |
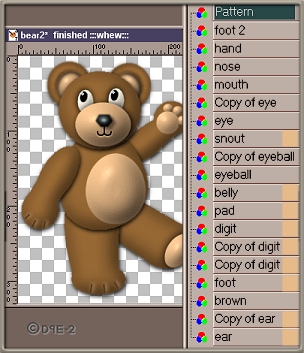 |
THE MOMENT OF TRUTH... : D Move the pattern at 50%, to the top, make any adjustments. This is how your finished image should look, with this layer palette order & the Pattern off. Now Merge/visible OR... (SAVE) the file, do the merge, make your jpg, go to Edit/un-merge. keep your file in layers, you'll have all the parts separate. I do the latter, & that's why this was 2nd file - to use all the parts again, see image on next page. The finished image will have some drop shadow, but not enough to interfere with any further type of shadowing, like I used on the tutorial page images. |
RETURN TO 1st PAGE |
