
| This PaintShopPro v7 tutorial for turning flat art into a dimensional graphic, utilizes the 3-D effects of the Inner Bevel and Drop Shadow provided with this program, no outside filters or other plug-ins are necessary to achieve these effects. The images and copy, below, give you a general idea of how this tutorial can be done. The downloads are provided so you can actually make this bear with the same results. These techniques can then be used for moving other black & white, flat art into the third dimension. This is my first attempt at authoring a tutorial. The image is named for my dh, who collects teddybears & it was created as a birthday gift to him. If you make a teddybear, it will be like giving him a present, too... : ) Like to see some of the TeddyBears created with the use of this tutorial, click here . Masterstoneman would love more additions to his collection, delete the NOSPAM & eMail me with the URL of your image and make him happy : ) |

GETTING STARTED: | |
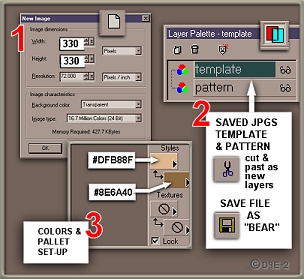 |
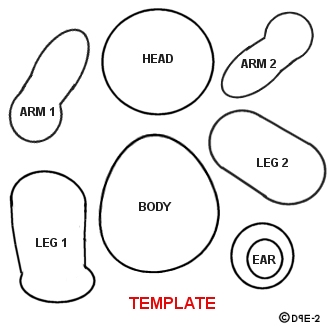
Download TEMPLATE Download PATTERN Download TEXT ONLY Download swiss 721 swa FONT Right click and save the Template & Pattern. If you are a new user of PSPv7, you will definately need the Text only page. It is highly recommended, too, for those more skilled with this version. Am working on making this tutorial compatible with V6. The tutorial will start with the three illustrated steps [ Oops! there's a typo in there...: ( ]. |
|
BASIC BEAR BODY: | |
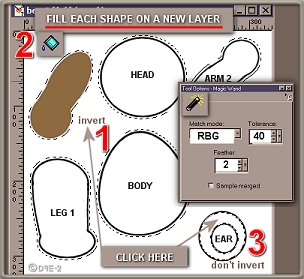 |
SELECTING & FILLING with These three steps & PSP icons show actions & tools to use.-THE TEMPLATE- Use the "Magic wand", set as shown, click Template layer bg, between the shapes, not on a shape. Invert, this selection and leave on, this selection is only made ONCE for all the body shapes, except the ear (see illustration). Use the "Fill tool" at your settings. Make a new layer for each shape, name it for the part, then one-by-one fill them with the brown color...the part layer must be the active layer when filling.. |
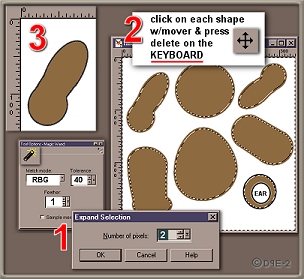 |
RE-DEFINING the PARTS Reset the wand. Template layer active, click between the shapes. Selections/ Modify/ Expand/ set the number to 2. With the "Mover tool", one-by-one, click on the parts & press the Delete key on your KEYBOARD (not in edit or the layers box). You should now be able to see the Template outline around each shape. |
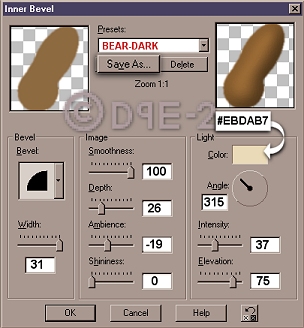 |
MAKING the PARTS 3-D -INNER BEVEL- Click 1st part w/Mover & go to Effects/3d/Inner Bevel. Use these settings, press the Save as...button, to save this preset. Repeat same IBevel for all but the ear, increase depth to 60 for it. MAKING the PARTS 3-D -DROP SHADOW- (Not illustrated) Click on parts, one-by-one, with the Mover... go to Effects/3d/Drop Shadow use these settings on each: Ver: 2/ Hor: 1/ Op: 100% Blur: 8/ Color: black |
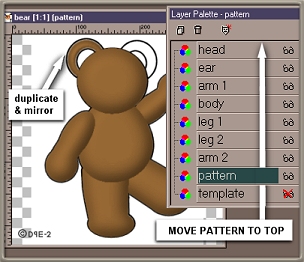 |
ARRANGING the PARTS with -THE PATTERN- Pattern on bottom, w/Mover move a part over its shape on Pattern. Arrange your Layers palette in order shown & your image should look like this. Duplicate/mirror the ear layer. (SAVE)&(SAVE AS) bear2, continue working with new file. Make Pattern 50% opacity, move to top, make any position adjust- ments. Pattern/off MERGE- VISIBLE & re-name layer brown. |
|
TO THE FINAL PAGE |
|
Legal notice is posted for any POTENTIAL ABUSER of this tutorial: An as-is image created by the use of this tutorial becomes the property of that creator for personal, not commercial, use. I retain the copyright of content, original images & downloads, created by me for the publication of this tutorial. Said items, in whole or part, are NOT TO BE REPRODUCED in eMail, on any other website, or in any vehicle for sale, without my written, signed consent. -$- Doing so without my permission will entitle me to due compensation. -$- |
Sad state to to have to post this... won't be sad, though, if I have to persue any theft... I'll be richer!

| eMail | My websites in flux CrystalCavern | CrystalWorks | visit Masterstoneman | Guestbook
Copyright ©2000-04 DPE/gemstonediva.com | all rights reserved